Hey there, young photographers! Ever wondered how some pictures have those extra-bright highlights that make them pop? Well, Photoshop has a secret weapon called the Dodge tool, and it’s going to become your best buddy.
In this lesson, we will explain what the Dodge tool does and how you may use it to improve your images, even if you are a total beginner.
Explain importance of dodge tool in adobe photoshop
Imagine you’re editing a portrait, and the subject’s eyes look a little dull. Or maybe you have a landscape shot where the clouds are getting lost in the shadows. The Dodge tool lets you selectively lighten specific areas of your image, just like a photographer dodging light in the darkroom (back in the film days!). It’s a fantastic tool for:
Bringing out details: Dodge those dark shadows to reveal hidden details in your photos.
Adding a glow: Want to make something shine? The Dodge tool can brighten highlights for that extra pop.
Balancing exposure: Did your camera settings leave some areas a little dark? Dodge can even things out.
Advantages & Disadvantages of the Dodge Tool in photoshop
Advantages:
Precise control: You choose exactly where to lighten, unlike just brightening the whole image.
Subtlety is possible: Want a natural look? You can dodge lightly for a barely-there effect.
Easy to use: Even beginners can pick up the Dodge tool quickly.
Disadvantages:
Overdoing it: Going overboard can make your photos look unrealistic and washed out.
Not a magic fix: It won’t bring back lost detail in super dark areas.
Practice makes perfect: Like any tool, mastering the Dodge tool takes a little practice.
Conclusion:
So there you have it!
The Dodge tool is a powerful way to add light and definition to your photos in Photoshop. Remember, with any editing tool, subtlety is key. Start slow, experiment, and you’ll be dodging like a pro in no time. Now go forth and create stunning photos that shine!
Frequently Asked Questions:
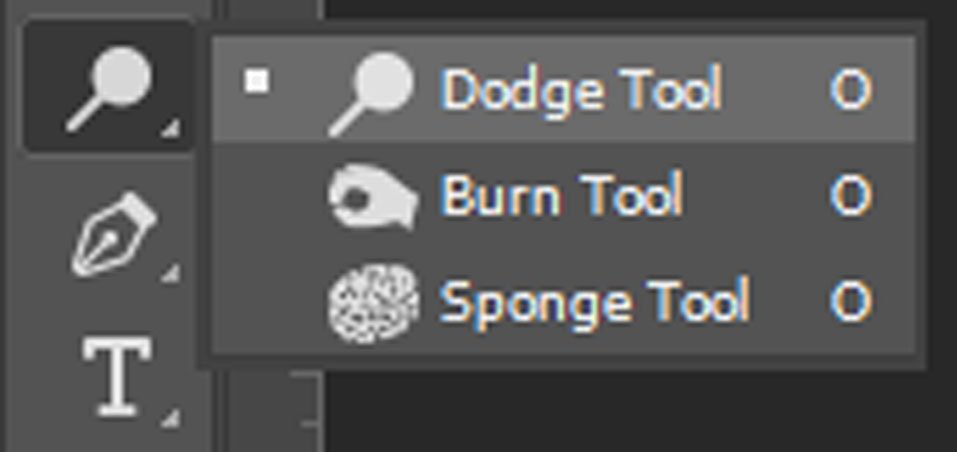
Q: Where do I find the Dodge tool in Photoshop?
A: It’s in the toolbox on the left side.
Look for a symbol that resembles a magnifying glass with a shadow underneath.
Q: What brush size should I use with the Dodge tool?
A: It depends on what you’re lightening. A small brush is good for precise areas like eyes, while a larger brush works well for bigger areas like shadows.
Q: Can I use the Dodge tool to fix a photo that’s way too dark?
A: Not really. The Dodge tool works best for lightening specific areas, not for major exposure adjustments.
Q: Is the Dodge tool the same as the Burn tool?
A: Almost! The Dodge tool lightens regions, while the Burn tool darkens them. They work together like a digital seesaw to balance the light and shadow in your photos.
Q: What’s the “Range” setting for in the Dodge tool options?
A: This lets you choose which tones get affected. “Highlights” lighten the brightest parts, “midtones” affect the middle range of grays, and “shadows” target the darkest areas.
Q: How can I avoid making my photos look fake with the Dodge tool?
Less is more: Always start with a low exposure setting and gradually build up the effect.
Zoom in: Get a close-up view to ensure you’re lightening the right areas and not affecting unwanted details.
Take breaks: Step away from your edit every few minutes to see your progress with fresh eyes.
Q: Are there any cool Dodge tool tricks?
A: Sure! Here are two:
Dodge and Burn for eyes: Use the Dodge tool to brighten the whites and catchlights in the eyes for a more awake look. Then, use the burn tool to subtly darken the lash line for added definition.
Dodge for a dreamy glow: Set the range to “Highlights” and use a soft brush with low exposure to gently lighten specific areas like hair or clothing for a soft, ethereal look.