The purpose of the blog is to guide users through the process of using the Quick Selection Tool for efficient background removal.
Open your image in Photoshop: Begin by launching Adobe Photoshop and opening the image from which you want to remove the background. Go to “File” > “Open” and select your image from the file browser.
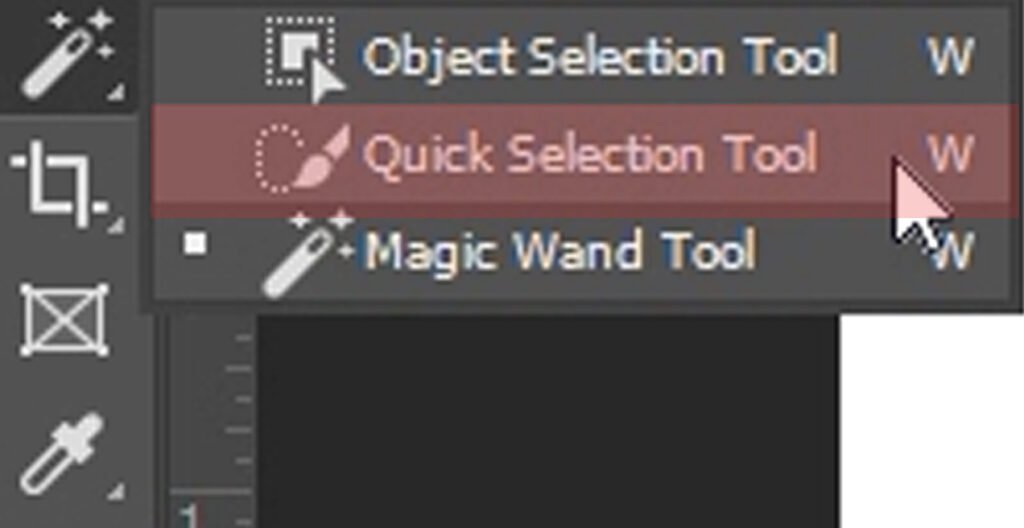
Select the Quick Selection Tool: Locate the Quick Selection Tool in the toolbar, usually nested with other selection tools like the Magic Wand and the Lasso Tool. Click on the Quick Selection Tool icon or press “W” on your keyboard to select it.
Adjust the brush size and hardness: Before making your selection, adjust the brush size and hardness to suit the complexity of the image. You can do this from the options bar at the top of the screen or by using the bracket keys “[” and “]” to decrease or increase the brush size, respectively.
Make your selection: Click and drag the Quick Selection Tool over the areas of the image you want to keep. Photoshop will automatically detect and select similar tones and textures, making the process quick and intuitive. For best results, start with broad strokes and refine the selection as needed.
Refine Your Selection: Once you’ve made your initial selection, you may need to refine it further for better accuracy. Use the options in the toolbar to add to or subtract from the selection, adjusting the edges as necessary. You can also use the Refine Edge tool for more advanced refinements, particularly for images with intricate details.
Invert the Selection: After refining your selection, you’ll likely want to invert it to select the background instead of the main subject. Go to “Select” > “Inverse” from the menu bar, or simply press “Shift + Ctrl + I” (Windows) or “Shift + Command + I” (Mac) on your keyboard.
Delete or Mask the Background: With the background selected, you have two options for removal: deleting it entirely or masking it out. To delete the background, simply press the “Delete” key on your keyboard. Alternatively, click the “Add Layer Mask” icon at the bottom of the Layers panel to mask out the background non-destructively.
Fine-Tune and Finalize After removing the background, take a moment to fine-tune your image and make any necessary adjustments. You can experiment with different backgrounds, apply filters, or make color corrections to achieve the desired result. After you’re happy, save your photo in the format of your choice.

Advantages of the Quick Selection Tool:
Speed and Efficiency: The Quick Selection Tool allows users to make selections rapidly by simply clicking and dragging over the desired areas. This speed and efficiency make it ideal for tasks requiring swift selection, such as background removal or object isolation.
Ease of Use: Compared to other selection tools in Photoshop, the Quick Selection Tool is intuitive and easy to use. Its click-and-drag functionality simplifies the selection process, making it accessible to both beginners and experienced users.
Automatic Selections: The tool employs advanced algorithms to automatically detect and select similar tones and textures, reducing the need for manual refinement. This automation speeds up the selection process and minimizes user effort.
Adjustable Brush Settings: Users can customize the brush size and hardness according to the specific requirements of the selection. This flexibility allows for precise adjustments, ensuring accurate selections even in complex images.
Disadvantages of the Quick Selection Tool:
Limited Precision: Despite its effectiveness for quick selections, the Quick Selection Tool may lack the precision required for intricate details or complex selections. Fine elements like hair strands or intricate patterns may be challenging to select accurately.
Difficulty with Similar Textures: The tool may struggle to differentiate between areas with similar textures or colors, leading to inaccurate selections. This can be especially problematic when working with images containing uniform backgrounds or subtle gradients.
Overlapping Selections: In some cases, the Quick Selection Tool may inadvertently select areas that were not intended, particularly when adjacent regions have similar characteristics. This can result in overlapping selections and require manual refinement to correct.
Limited Control in Fine-Tuning: While the tool offers options for refining selections, such as Add to Selection and Subtract from Selection, users may find it challenging to achieve precise adjustments, especially in complex images. Fine-tuning selection edges may require additional tools or techniques.
Difficulty with Hard Edges: Images with sharp, well-defined edges may pose challenges for the Quick Selection Tool. It may struggle to accurately detect and select these edges, resulting in jagged or uneven selections that require manual correction.
Quick Selection Tool FAQs
Are there any keyboard shortcuts for the Quick Selection Tool?
Yes, pressing “W” on your keyboard will select the Quick Selection Tool. Additionally, using “[” and “]” will decrease or increase the brush size, respectively, offering quick adjustments while making selections.
Is the Quick Selection Tool suitable for all types of images?
While the Quick Selection Tool is versatile, it may not be ideal for all types of images. Images with highly irregular shapes, transparent elements, or intricate details may require alternative selection methods for better results.
Can the Quick Selection Tool handle complex selections?
While the Quick Selection Tool is effective for many tasks, it may struggle with intricate details, similar textures, or images with sharp edges. Users may need to employ additional techniques or tools for more complex selections.
Can I use the Quick Selection Tool for non-destructive editing?
Yes, users can combine the Quick Selection Tool with layer masks for non-destructive editing. Instead of permanently deleting selected areas, users can mask them out, preserving the original image and allowing for easy adjustments later on.
For more information, watch the full video. link given in below


